RE Registration FAQ
Frequently Asked Questions
1. I’m logged in to My Own Church. Where do I go to review my family information?
2. I found my family details. What exactly do I need to check? Can I update the information myself?
3. I’ve reviewed my family’s basic information, but how can I update info for individual ADULT family members? What do I need to check on for them?
4. How are profiles different for children? What info is required specifically for RE?
5. How do I check my child’s sacramental record?
6. How do I enter my child’s school information?
7. What if an entire family member is missing? Can I add a new person to my family?
8. I’ve reviewed my family’s information and it’s all up to date. Where do I go to enroll my child(ren) in RE?
1. I'm logged in to My Own Church. Where do I go to review my family information?

- A. Click on “My Family” under Quick Links--or, you can simply click on the My Family tab at the top of the page.
- B. Select “Family Detail” in the blue bar just beneath the row of tabs at the top of the page. A pop-up image should appear on your screen displaying your family’s profile.
2. I found my family details. What exactly do I need to check? Can I update the information myself?
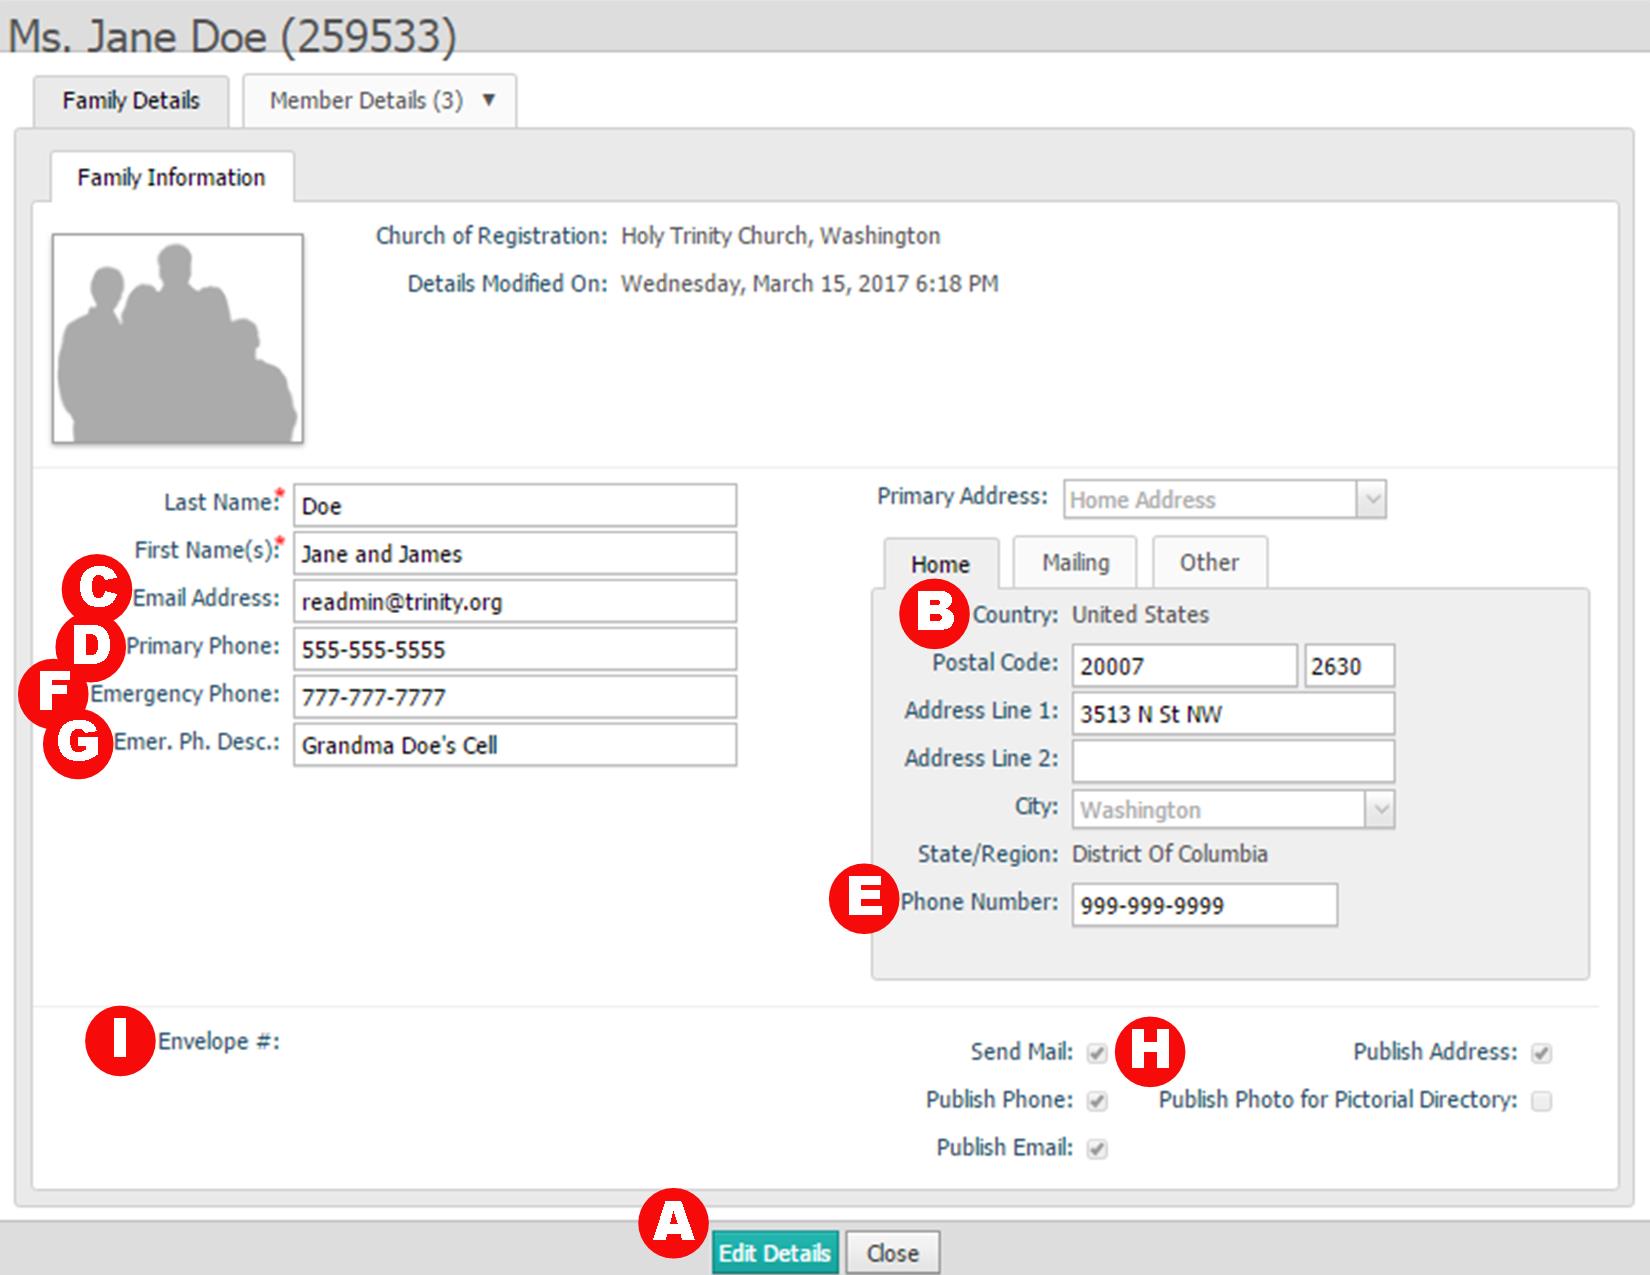
- A. After clicking on “Family Detail,” the first page you see displays your family information. In order to edit, you must FIRST click on the turquoise “Edit Details” button at the bottom of the window.
- B. Home Address: Review and make any updates.
- C. Email Address: This is the primary family email address, and it is the default used for communication for all RE matters if no others are entered. You may enter up to five addresses in this field; they should be separated by a semicolon and NO SPACES, like so: example1@email.com;example2@email.com;example3@email.com. The page will not allow you to save if the addresses are not formatted correctly.
- D. Primary Phone: Your primary phone should be the one you wish to be used for most communication purposes. You may enter up to two numbers separated by a semicolon.
- E. Phone Number: The phone number listed underneath the home address can be the same as your primary phone, or you may include a landline, etc. as an alternative to the primary phone. You’ll have a chance to add your cell phone later.
- F. Emergency Phone: This field is especially important for RE families. Please provide a number we can use in case we are unable to reach parents/guardians in the event of an emergency.
- G. Emergency Phone Description: Tell us the name of the emergency phone contact.
- H. Review these check boxes to control what information others parishioners can see about you when they search the directory.
- I. Your envelope number will be assigned by the parish. If you don’t have an envelope number, send an email to registrations@trinity.org, and we can make sure one is assigned.
3. I've reviewed my family's basic information, but how can I update info for individual ADULT family members? What do I need to check for them?
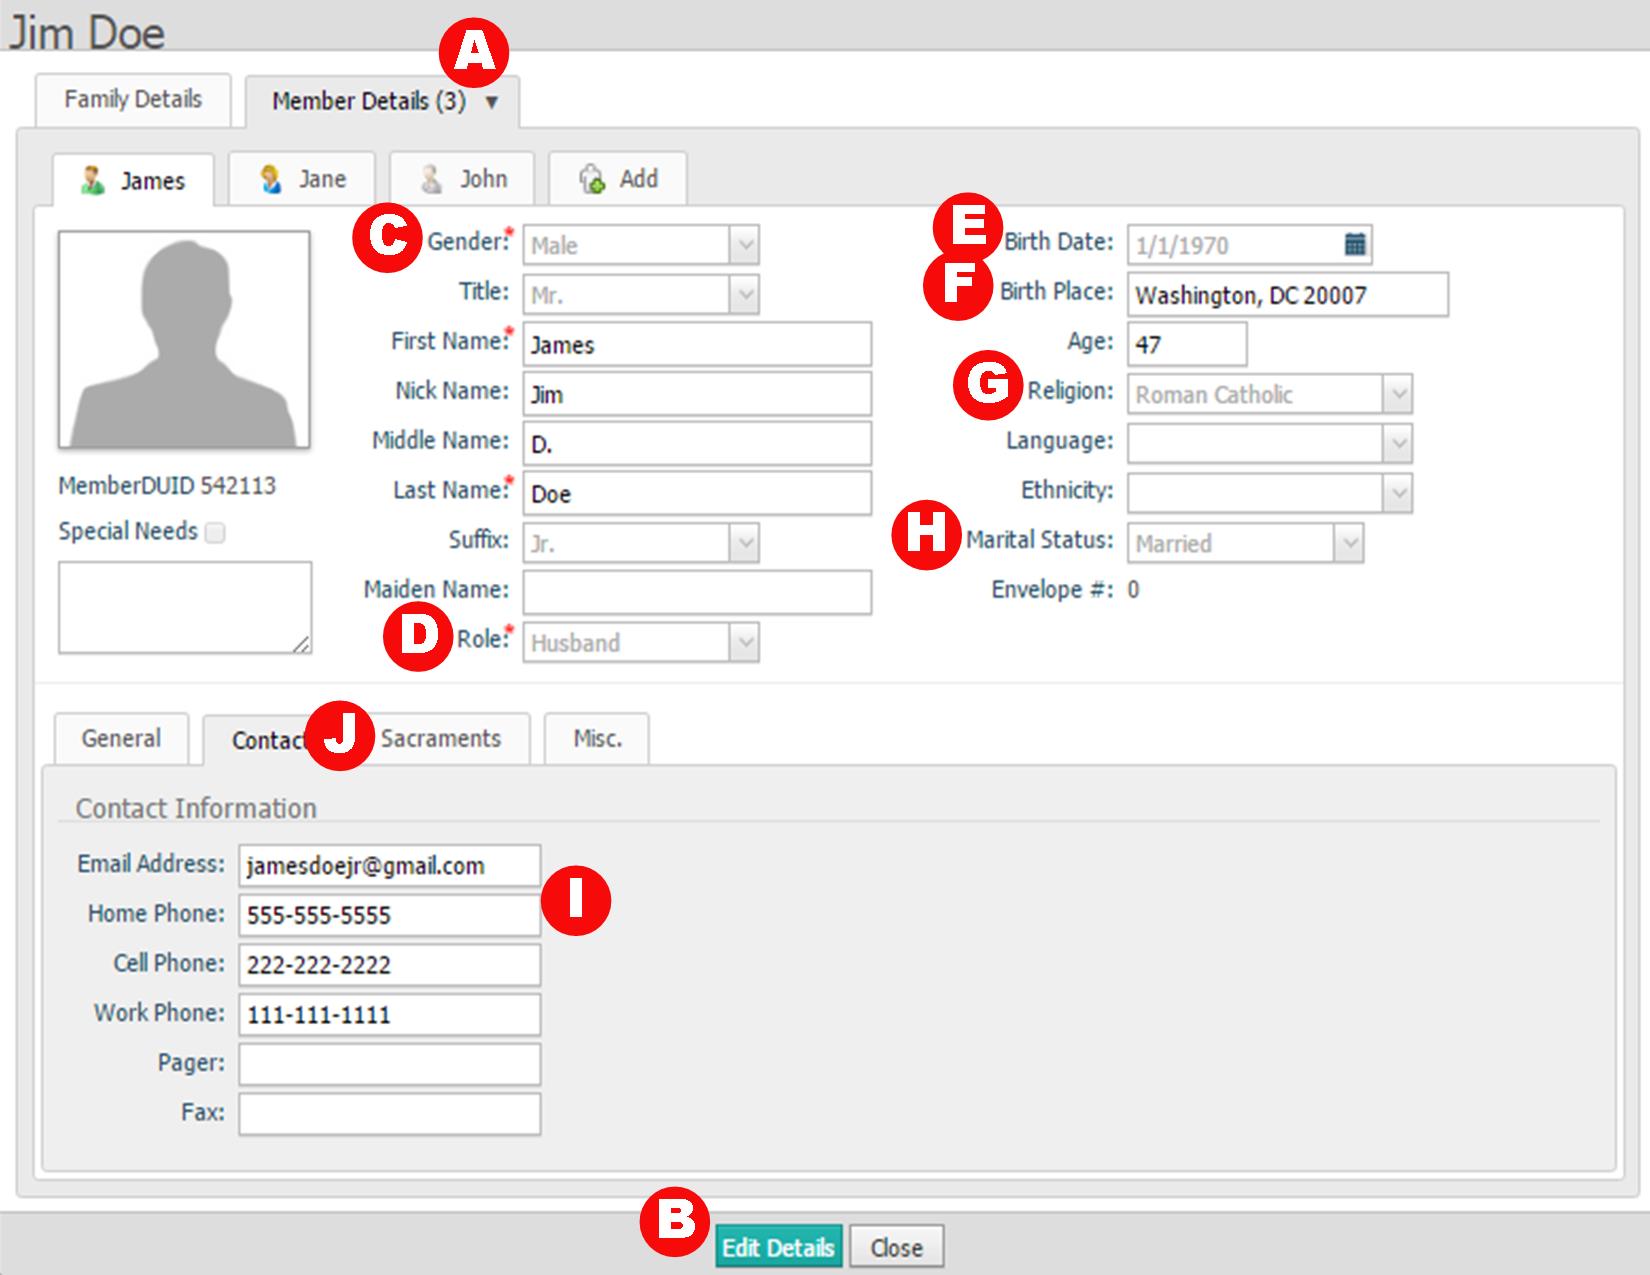
- A. Once you’ve finished reviewing your family data, click on the tab near the top of the window that says “Member Details.” You may have to click on the arrow on the right-hand side of the tab to select a particular family member.
- B. Again, in order to edit any of the information that you see, you must FIRST click on the turquoise “Edit Details” button at the bottom of the window.
- C. Personal Information: We need you to fill in all fields in this column as they apply to you. Note: “Nick Name” really refers to a “Preferred Name”; for that reason, we ask that everyone enter a Nick Name even if it’s the same as the First Name.
- D. Role: For most adult parishioners, your role with be either “Head” (head of household), “Husband,” “Wife,” or “Adult.” You may decide with your partner whether you wish to be in the system as husband and wife, or whether you wish to have a head of household, etc.--that choice is up to you.
- E. Birth Date and Age: Enter your birth date, and My Own Church will automatically fill in your age as well.
- F. Birth Place: Please click on the small grey box to the right of the field. A dialogue box will pop up to help you find the most precise location. Make sure the country is correct, then enter your zip code and click on “Find Postal Code.” Your city, state, and zip code should be automatically entered into the field.
- G. Religion: Please make sure the selection accurately reflects your faith community.
- H. Marital status: Please make sure the selection is accurate and up-to-date.
- I. Contact Information: You may fill in as many of these fields as you like. Note: this is the place to include cell phone numbers for individual family members if you wish.
- J. Sacraments: Click on the Sacraments tab to view the sacraments we have on record for each of your family members. If you would like to update this information, please send an email to registrations@trinity.org.
4. How are profiles different for children? What info is required specifically for RE?
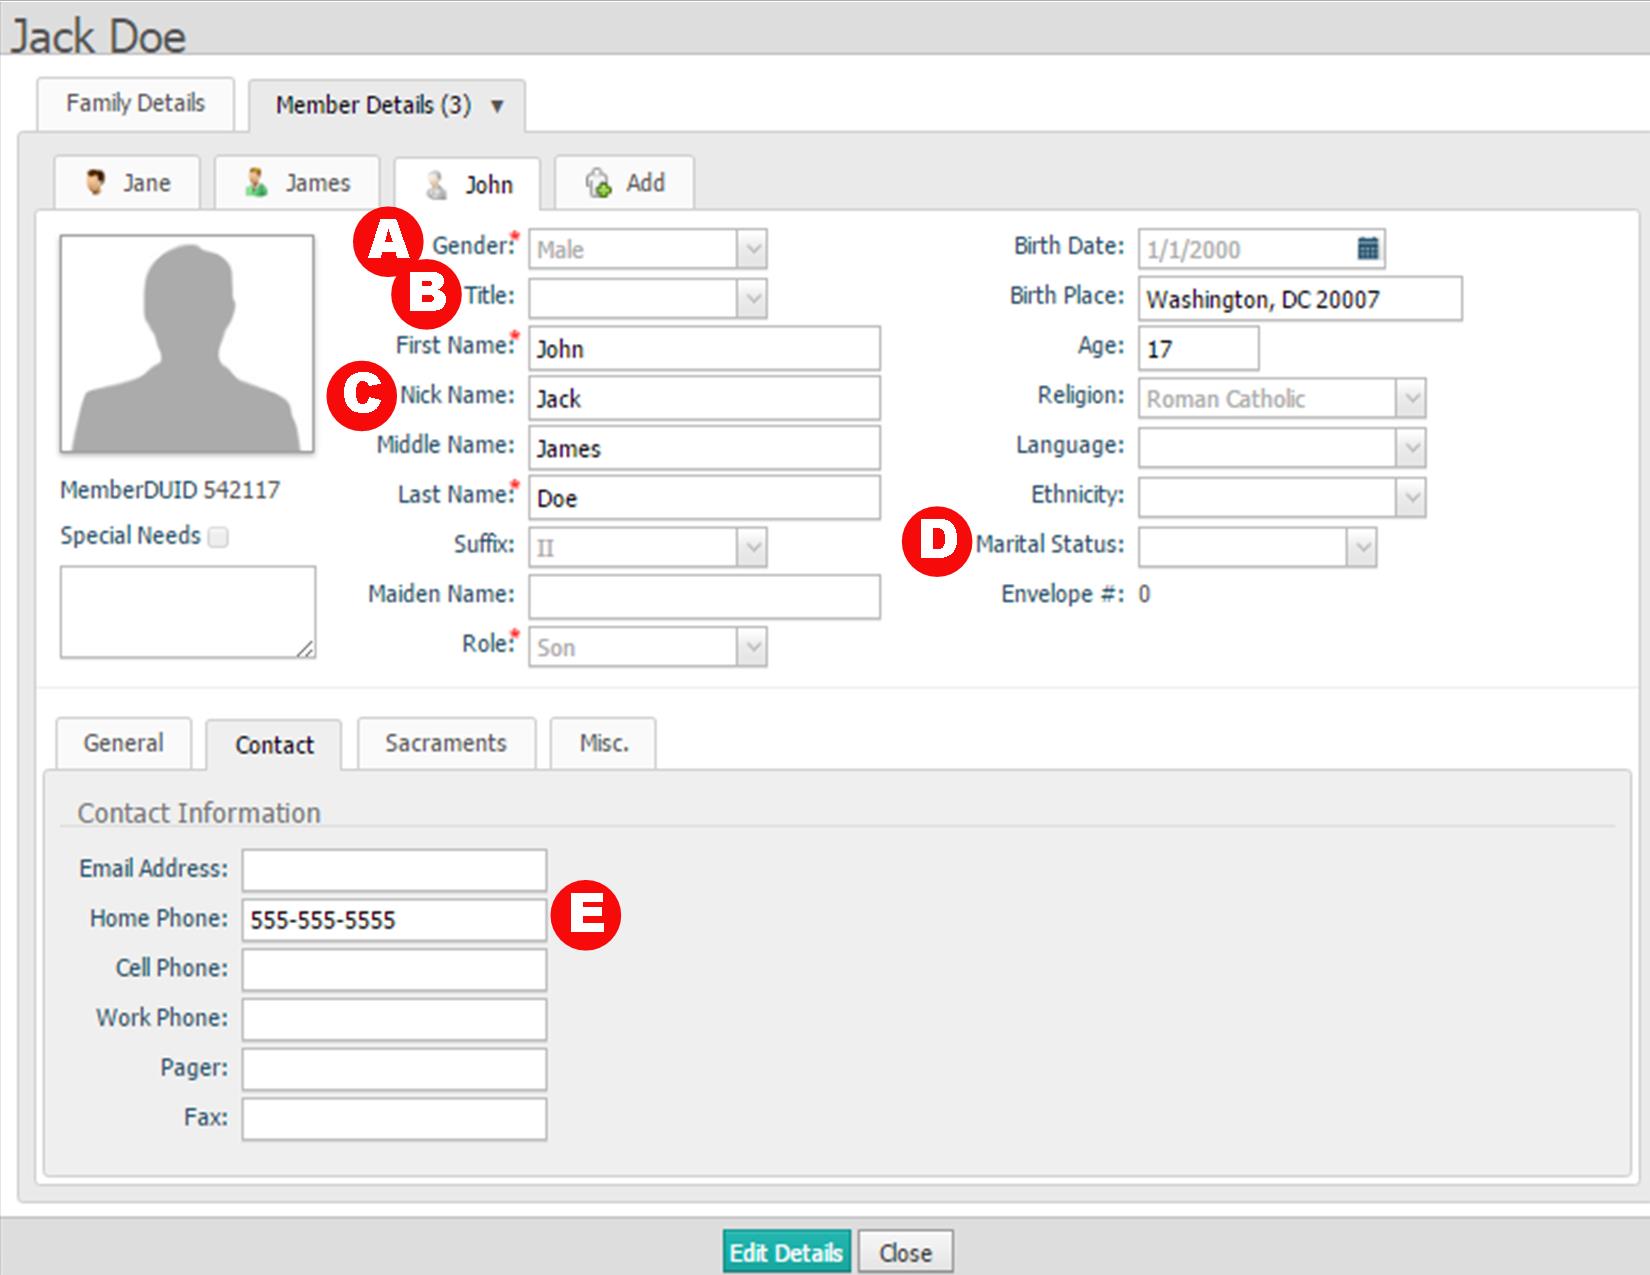
- A. Personal Information: These fields should be filled in largely as they would be for adults, with a few exceptions. All exceptions are listed below.
- B. Title: Minors do not require a title; please leave this field blank.
- C. Nick Name: “Nick Name” really refers to a “Preferred Name;” for that reason, we ask everyone to enter a Preferred Name/Nick Name even if it’s the same as the first name. This step is very important for making our class rosters as accurate as possible, even if you do not normally think of your child as having a nick name. The reason? Many children do not go by their legal first name, and we can only create class rosters that include preferred/nick names if EVERYONE has entered a nick name. Thank you for your careful help on this point!
- D. Marital Status: Minors will not have a marital status; please leave this field blank.
- E. Contact Information: ConnectNow’s My Own Church will draw a child’s contact information from the Family Details page--UNLESS you enter different information here. In other words: you need only enter contact information here for your child if you want it to be different from that of the family as a whole.
5. How do I check my child's sacramental record?
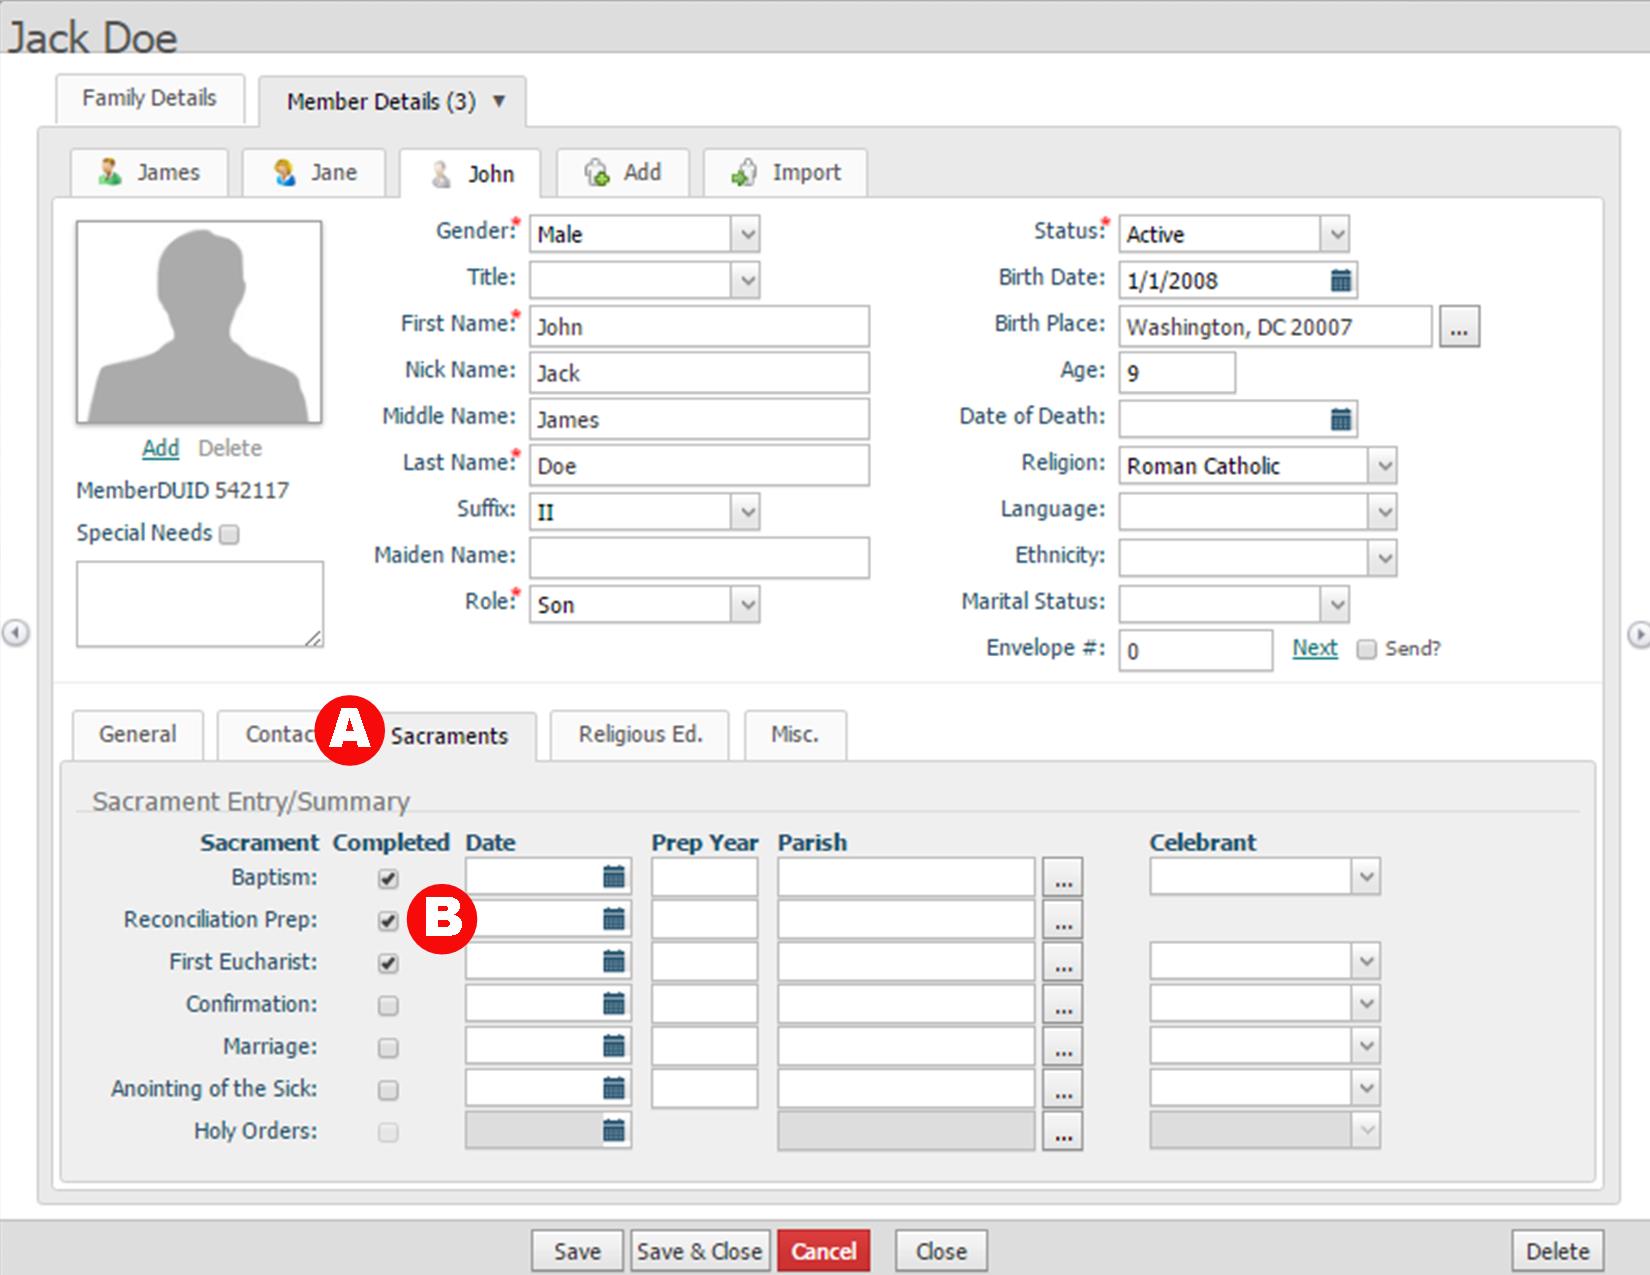
- A. Click on the Sacraments tab to view the sacraments we have on record for each of your children. This is a recommended step for adult family members, but a required step for children in RE.
- B. All you need to see is that the appropriate sacraments have the box next to them checked--no additional information needs to be present. If you would like to update the information you see, please send an email to registrations@trinity.org.
6. How do I enter my child's school information?
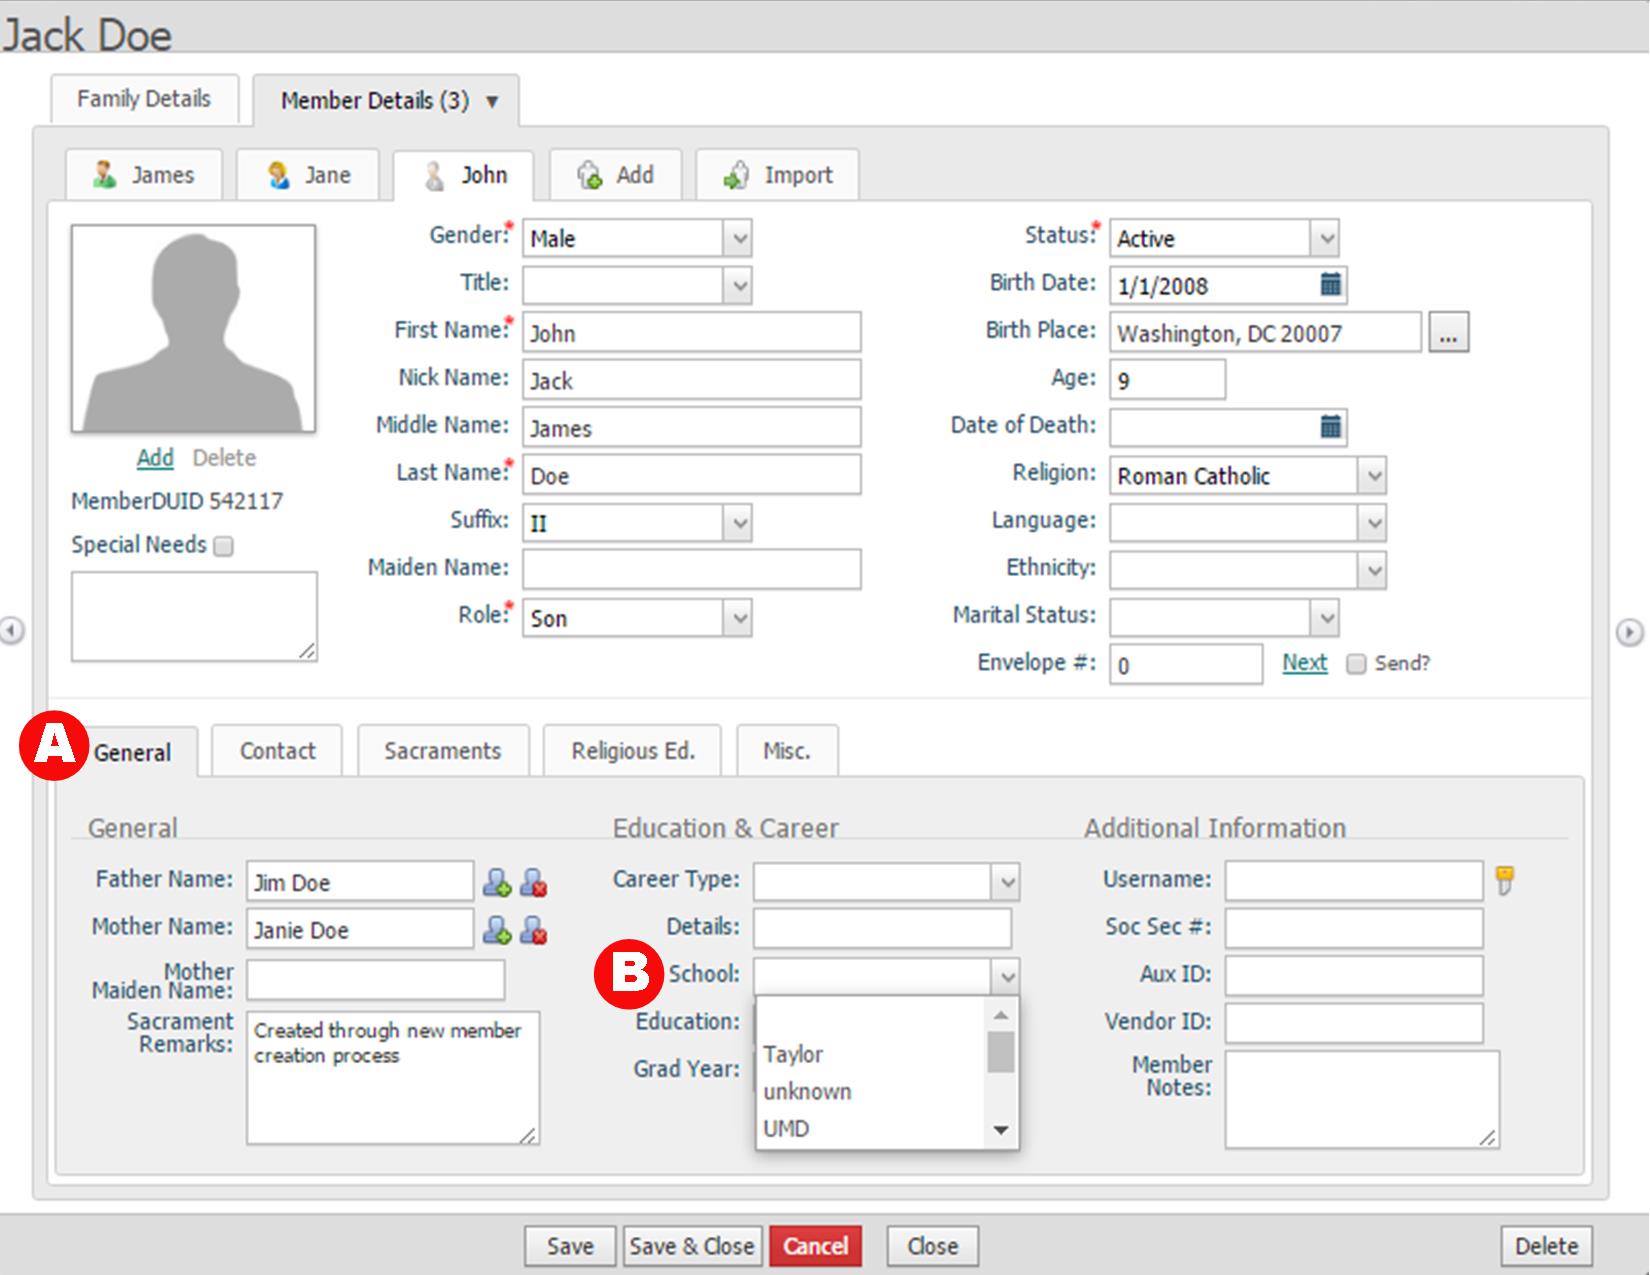
- A. School information: Click on the General tab to enter your child’s school information.
- B. Go to “School” in the the “Education & Career” column. You can search through the drop-down box for your child’s school, or you can begin to type the name in and then select from one of the auto-suggested options. If your child’s school is not on the list and so you are unable to enter your child’s school information, please send an email requesting that the school be added to registrations@trinity.org.
7. What if an entire family member is missing? Can I add a new person to my family?
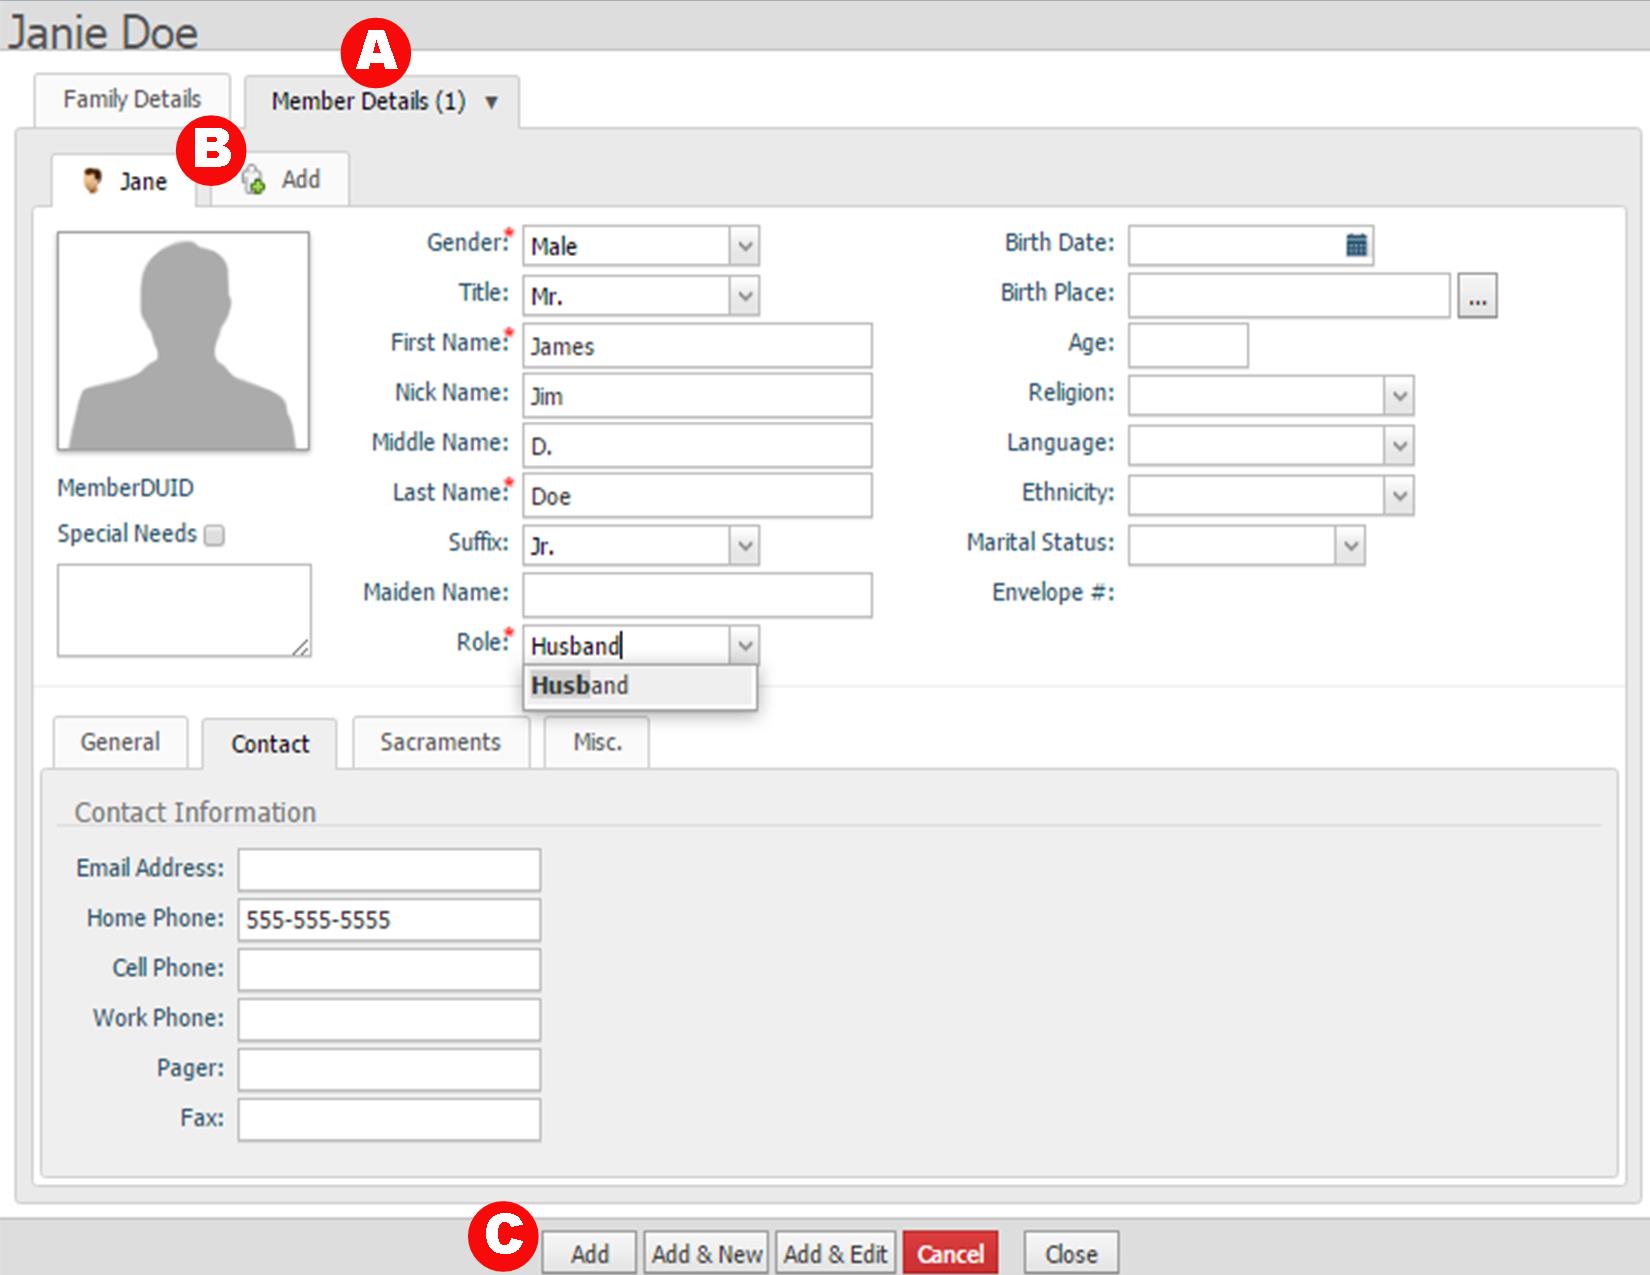
- A. Click on the “Add” tab next to the last listed family member.
- B. Fill in the fields as instructed above, depending on whether the new member is an adult or a child.
- C. When you’re finished, you can click on “Add” to add the new member and return to the member’s profile if there are no further changes to make; “Add & New” to finish adding the current member and then start adding yet another new member to the family, or “Add & Edit” to add the new member to the family and keep editing that same member’s profile.
8. I've reviewed my family's information and it's all up to date. Where do I go to enroll my child(ren) in RE?
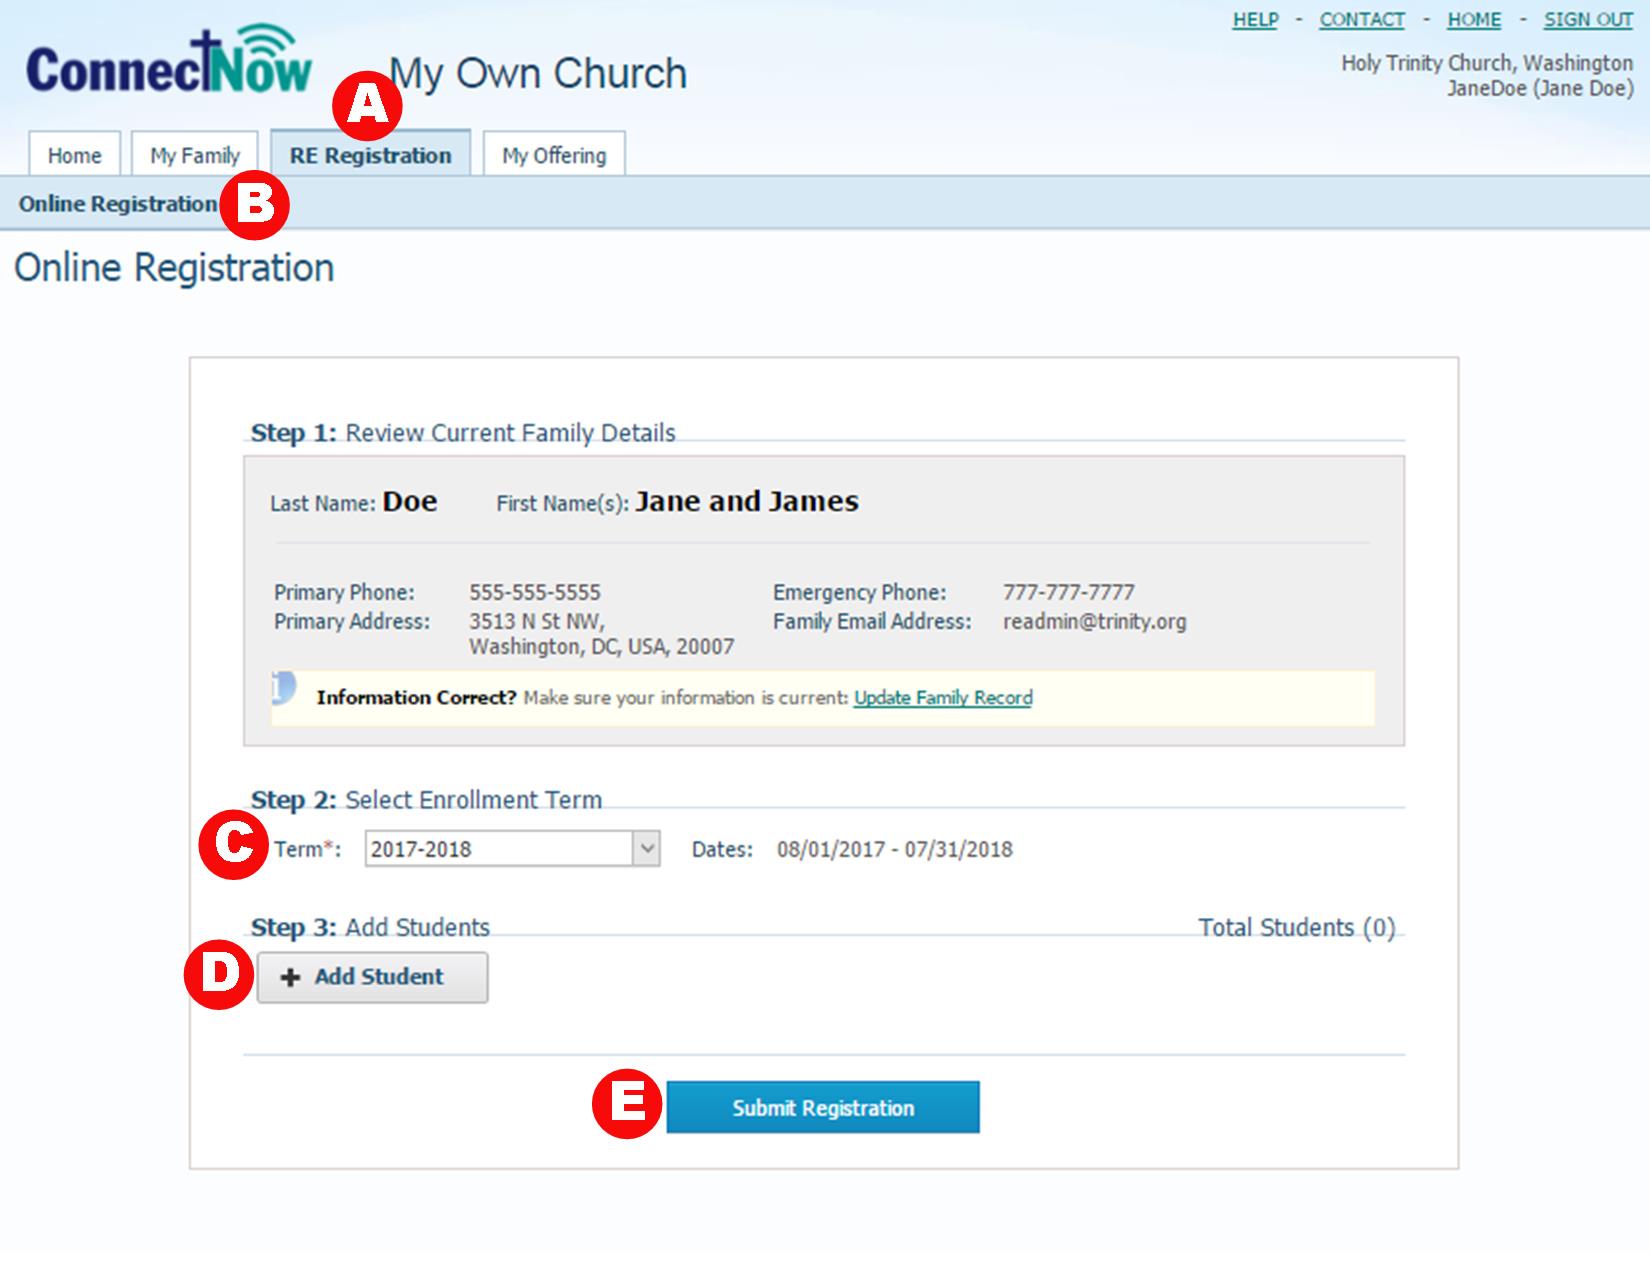
- A. Close out of your family/member details window, and click on the “RE Registration” tab at the very top of the page.
- B. Select “Online Registration” in the blue bar just beneath the row of tabs at the top of the page. A pop-up image should appear on your screen allowing you to register all of your children for RE.
- C. Select the Enrollment Term: Use the dropdown menu to select the upcoming RE year.
- D. For each child, click the grey “Add Student” button. A pop-up window will appear asking you for any health and behavioral information you’d like to share. You will also be invited to select a Class Preference for your child; however, please simply select your child’s grade level from the drop-down menu under 1st Choice. Your child will be placed in an individual class after the main registration period closes.
- E. Once you have added all the children you would like to enroll, click on the bright blue “Submit Registration” button to complete the process.
